30 Day Coloring Challenge

10954881_402424033272422_431318252_n

From March 4 to April 2, I’m participating in The Daily Marker 30 Day Coloring Challenge (details here). Every day, I’m coloring *something*, even if it’s just for 5 minutes, and I intend to have a few works in-progress throughout the challenge.

You can follow along on Instagram via #thedailymarker30day, and you can find my efforts there under my username saffronkingfisher .

Best of Days 1-5

If you want to get coloring, it’s never too late to jump in!


THE SKY IS THE LIMIT Challenge

Mosaic 2-28-15

I’m down to the wire, but here is my entry for Power Poppy’s THE SKY IS THE LIMIT challenge.

Photo Feb 28, 10 26 21 AMHere is my inspiration photo, taken by me, with an iPhone, no filters. I live in SoCal, and winter is when we get spectacular sunsets. Sometimes the sky is lavender, and sometimes it is neon with the last glow of the sun.

Photo Jan 30, 5 23 52 PM

I decided to go bold with my entry, showing off the amazing hues of my sunset.  I haven’t seen the sky go green yet, but I think it sets off those pink, oranges and purples so well. I stamped multiple images from the Orchids Rock set, to create a sort of pattern.  This card is another step away from a realistic style of coloring, but I really like playing with these images in new ways.

Photo Feb 28, 9 40 05 AM

One technique I used a lot of this time was tip-to-tip blending. For both the background and the flowers, I either needed a marker I didn’t have, or needed to “invent” a new color. I’m definitely still learning, but I’m glad for the practice.

Photo Feb 28, 10 26 40 AM

The sentiment is from the same set–I figured that anyone who receives this unconventional card will appreciate the inspiration. 🙂

Photo Feb 28, 10 25 23 AM

COPICS Used:
BV0000, BV000, BV00, BV04
YG0000, YG00, YG03
YR0000, YR000, YR02
RV0000, RV000, RV00, RV02, RV25

Countryside Bouquet Accordion Birthday Card

Photo Jan 30, 11 31 34 AM

My mom is an artsy lady who likes to paint with watercolors.  When her birthday comes around, I always try to make her something pretty and creative, or perhaps show her a new technique I’ve learned.

Photo Jan 30, 11 30 07 AM

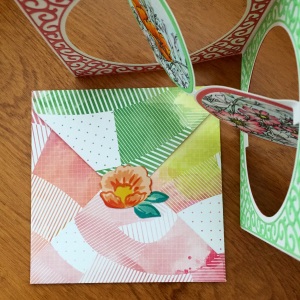
I think these accordion card dies from Karen Burniston are so cool! They’re easy to put together, and the finished card looks so impressive.  You can learn more about the dies and assembling the cards from Karen Burniston herself in this video.

Photo Jan 30, 11 31 17 AM

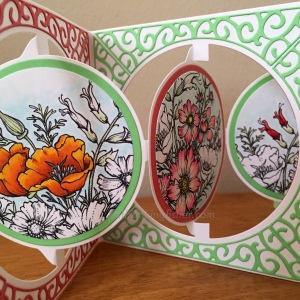
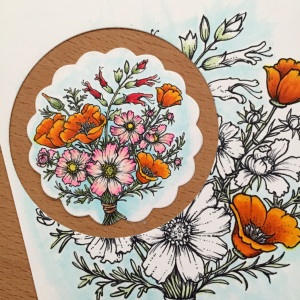
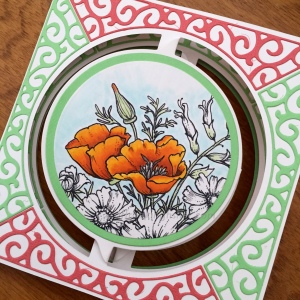
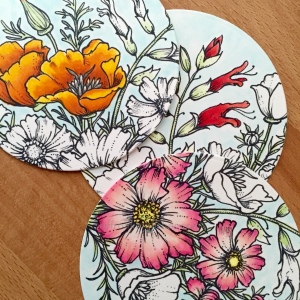
For this years birthday, I used the Countryside Bouquet digital stamp from Power Poppy.  For each of the three main panels, I colored just the Coreopsis, or just the California poppy, or just the Salvia in the bouquet.

Photo Jan 28, 1 29 24 PM

On the back of the of one of the panels, I included a small version of the bouquet, with all three flowers colored.

Photo Jan 30, 11 29 14 AM

I wanted to add some trim pieces around the edges, and I chose flourish edges from the Frame Edges die set.  I cut 16 of these edges to go around the panels of my card. A tip for cutting out these pieces: run strips of paper through your xyron before cutting, and you will get a perfectly cut, perfectly sticky trim piece, with no extra adhesive clinging to the edges, and no trying to glue down tiny swirls of paper!

Photo Jan 28, 1 26 07 PM

After I got the trim pieces placed on my card, I ran a clean brayer over them to make sure they were stuck down securely.

Photo Jan 28, 3 20 26 PM

I used a combination of dies from the accordion card set and other circle dies to cut out my colored images and backgrounds.

Photo Feb 10, 8 13 58 PM

Photo Jan 28, 3 19 48 PM

I once I assembled the panels, I added some additions to the back, such as a sentiment (not shown) and this sweet quote, stamped on some Basic Grey Fresh Cut Paper.

Photo Jan 30, 11 29 31 AM

I also made a custom envelope, using more Fresh Cut paper and my WRMK envelope punch board.

Photo Jan 30, 3 17 49 PM

You can see the finished card in motion on my Instagram.

Photo Jan 29, 3 01 59 PM

Camelia Tags and a Gift Bag

3 camellia tags

I’m back with some more tags. Previously, the Power Poppy blog has inspired me to deconstruct those gorgeous floral images, and it may be my favorite twist on the usual stamped and colored card.  This time, I printed and colored the Camellias digi stamp.  I was experimenting with shading some acid green leaves, and the finished image turned out *really* vivid!

purple camellias full image

I decided that maybe the flowers would be most effective in small doses, so I die cut a slew of tags. I backed all of them with lavender card stock, and then stamped and heat-embossed small sentiments on each. Several of the Power Poppy stamp sets have a perfect, tiny “For You” that’s just perfect for a gift tag.

several camellia tags

My newly-crafted tags inspired me to make this little gift bag for my friend Dani, who gifted me a couple of ink pads.

camellias gift bag

I cut the bag pieces from card stock that is a much brighter light green in real life! Then I die cut a butterfly, outlined the shape with stickles, added some acetate for backing, and assembled the bag.

gift bag lawn fawn die

I filled it with some Speculoos-filled chocolate cups from Trader Joes, and tied the top with some lavender seam binding.  I tied my tags together with twine and then attached them to the bag. I think it looks very springy!

camellias gift bag close up


Supplies:

Power Poppy Camellias digital stamp
Copic Markers
Avery Elle tag die: Simply Tags
Simon Says Stamp tag die: Tiny Tags
Lawn Fawn Treat Bag die
Hero Arts butterfly die: Antique Butterflies & Flowers Framelits
Paper Source Lavender card stock and twine

It’s Never Too Late For Tags!

Bells tag

Hi there! I had grand plans to write several blog posts about my Christmas crafting, but then I caught a bug over Thanksgiving that has really thrown a wrench into those plans! However, I’ve really enjoyed making all sorts of tags this season, and I thought I’d share those with you.

3 tags

The tag on the left is my take on the chalkboard trend. I heat embossed (with white powder) a sentiment from Power Poppy’s Joyful Arrangement Stamp set onto a a die-cut tag from Papertrey Ink.  I couldn’t believe how perfectly everything fit! I added some sweet greenery cut  with Impression Obsession dies. The candy-striped twine is by Lawn Fawn.

The center tag uses that great cool santa from Ellen Huston’s Tis the Season stamp set. A little copic coloring, a pom-pom and a few jingles bells finished this tag off. I’ve got a variation on this tag further down the post.

The right-hand tag is my CASE of Nichol McGuirk’s super cute No Peeking tag, using Mama Elephant stamps and Pretty Pink Posh dies and sequins.

3 tickets

Front back ticket

I really enjoyed making these ticket tags! Instead of making punching holes and using twine, I decorated some small clothespins (washi tape, super easy) and used those for attaching my tickets.  These tickets are only 2″ long, so tiny die cuts, gems and stickers look right at home.

Tree tags

Punched tree shapes let me make use of all of those sequins and enamel dots I seem to be hoarding 😉

Santa pocket tag

Here’s that santa again, but this time the tag has a built-in pocket (I know it’s hard to see!). I made this pocket tag by die cutting a folded piece of card stock, with the left edge of the die just off of that fold when I ran it through my Big Shot. I secured the edges of the tag with 1/8″ Scor-tape, and it will juuuuust fit a gift card in that pocket, so using strong adhesive is key.

Round ombré tags

These round tags use stamps and a die from Papertrey Ink’s Tinsel and Tags kit. I created an ombre look with Avery Elle pigment inks.

More tix

Merry Christmas Eve!

Peep of the Week: Sunflower Flair

Photo Aug 28, 7 38 43 AM

This is my latest Peep of the Week entry, and this card was also a prototype for my entry in the Pop Goes the World challenge, as I was experimenting with repeating sunflower and circle designs. At the same time, I decided to try a neat technique for making DIY embellishments.

Photo Aug 28, 7 39 43 AM

I had made a few “epoxy” blanks already (the secret is glossy accents and acetate!), so I stamped three sunflower sprays, colored them with copics and then die cut matching shapes. To finish my Sunny Harvest “flair,” I adhered the sunflowery circles to the blanks. I used three of these embellishments to create a card with raised elements. I coordinated the background of the flair with the pattered paper, enamel dots around the sentiment, and the polka-dotted card base.

Photo Aug 28, 7 40 04 AM

Pop Goes the World Challenge

IMG_1546

My entry for the Power Poppy August Pop Goes the World challenge uses the sunflowers from the Sunny Harvest stamp set. This month’s challenge had a color requirement—to use at least three of the following colors: turquoise, buttery yellow, rusty red, and grassy green. I was inspired by a cool pack of paper I found at The Stamp Addict’s annual garage sale, which features sunflowers, daisies and butterflies on backgrounds of greens and blues.

I wanted to try a “sunken 3-D” effect, so I layered copic-colored sunflower sprays under a column of circles die cut from the patterned paper. While this paper had the requisite buttery yellows on a turquoise background, I repeated those two colors on my sunflowers and also added bright green berries.

Photo Aug 27, 2 09 34 PM

I used a sentiment from the Sunny Harvest set, and added some enamel dots from the My Mind’s Eye Market Street collection. I decided to repeat the gold sparkle from the enamel dots on the sunflowers with a swipe from a Wink of Stella gold pen.

Photo Aug 27, 2 08 39 PM

I thought a polka dot card base (Lawn Fawn) would add a whimsical touch, and then I went even further by die-cutting a ruffled edge on the bottom (also Lawn Fawn).

IMG_1550